How I Use Obsidian
Reading Time: 21 minutes, 25 secondsI have kind of a weird job. It's very cross-functional, so I have to keep track of a lot of different things. I need to write product documentation, create online training courses in Articulate Storyline, manage an LMS Platform, do about 8.5 hours of customer webinars per month, and manage the technical support system for both customers and partners/resellers. On top of that, I have to create software simulations, set up and administer our Zoom and Zendesk accounts, plus help marketing and sales with webinars, and do video production and editing. I also assist the product and engineering teams with product changes, bug fixes, release notes, and more. And on top of that, there are the special tasks that get sent my way from the CEO and other members of the executive team. Basically, there's a lot to track on a daily basis.
Oh, and I also have personal writing (like this article) and other projects, though that's very much a minority of the content I produce.
 For years, I've worked with a lot of different note-taking and tracking systems: OneNote, Outlook, Jira/Confluence, Word documents, Excel spreadsheets, and so forth. But, about two weeks ago, I came across a free—sorry, let me emphasize that: free—note-taking application called Obsidian. It's billed as a note-taking app that, though a system of backlinks and metadata, along with plain old folders, enables you to link notes in a web-like structure, to create complex relationships between notes. Obsidian bills it as a "second brain".
I started to use it, and it changed my life.
I thought it might be helpful for other people if I just walked through how I have Obsidian set up, in the hopes that it might help others who want to try Obsidian. I'm not going to go into the technical details about how to set up every little thing. There's plenty of how-to technical guides online, in both text and YouTube Video formats, that cover the technical specifics.
Instead, I want to concentrate on the organization of my Obsidian vault, how I use backlinks and metadata, and how the setup helps keep me organized. I'll go over the pieces you need, and describe how I use them. My main concern with this article is covering the practical organizational and workflow methods that Obsidian enables me to use.
Brief Overview of Obsidian
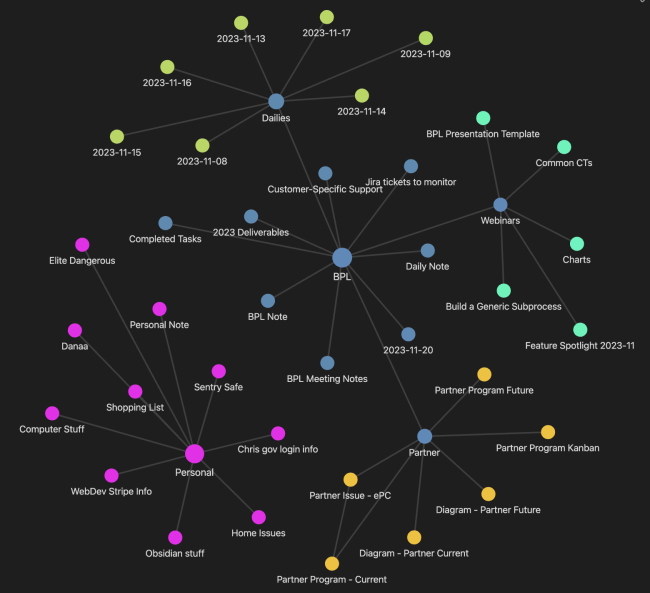
Obsidian is basically a note-taking application. (Oh, and did I mention that it's free? Because it is.) That sounds super boring and vanilla, but, believe me, it isn't. Creating backlinks between notes, and adding metadata properties to notes, creates a powerful means of treating your notes like a database. You can visualize your notes' structure, for instance, using the built-in graph that's displayed above.
An enormous plus for Obsidian is that nearly everything you create is stored in plain text, using Markdown syntax. Writing in Markdown is a favorite of mine. Having nearly everything stored in plain text is great because, even if Obsidian goes out of business, you still have all of your Markdown documents, because they're not stored in a proprietary format. Note I said "nearly everything" is stored in plain text. There's a drawing plugin I use, which I'll cover later, and you obviously can't store drawings in plain text. Outside that, though, it's all text-based.
Notes in Obsidian are usually displayed as formatted text, but you can also display them as presentations, a la PowerPoint, as Kanban bins, or in a built-in mind-mapping tool called a canvas. In fact, for a webinar I presented to customers last week, I used Obsidian for the presentation, and ditched PowerPoint. I'll be doing all my public presentations in Obsidian from now on. I'll show you a canvas and Kanban example later.
When you first install Obsidian, you have to set up what they call a "vault". The obsidian vault is simply a folder that contains a couple of specific subfolders, whose names all start with a "." character. These are hidden folders, on a Macintosh at least. I really dislike hidden folders, so I have both my Mac and PC set to show all hidden files and folders. Your vault is always stored locally, so you'll always have it (as long as you don't lose both your hard drive and your backups, of course), even if Obsidian goes away.
The upside of local storage is that you, and only you, have access to your notes. You control the storage and backup methods you want to implement. The downside of local storage is that it's hard to use Obsidian to work and play well with others. To help overcome that, every note can be exported to PDF format, and you can share the PDF through Teams, Slack, or whatever. Similarly, drawings can be exported into the PNG image format. But you can't have shared notes that multiple users can access for collaborative editing.
Local storage also imposes additional syncing concerns if you use multiple devices, which pretty much everyone does. Most of my work is done on PC, but I also have a Macbook, as well as an iPhone and iPad, and I want my vault shared across all of my devices. Obsidian does offer a sync service, but it costs ten bucks per month. I didn't want to pay that. Instead, I created my vault in an iCloud drive on my PC. That way, my vault is automatically available on all my devices, since there's an Obsidian app for both Apple and Android. I can work on any of my four different devices, and all my work gets replicated across iCloud. I know some of you don't want to use iCloud, OneDrive, Google, or whatever, but it works for me.
The Technical Setup
Let me briefly cover how I have Obsidian set up, in terms of the installation and plugins.
My visual theme for the UI is the vanilla Minimalist theme that ships with the product. There are many Community Themes you can download from the Settings dialog box in Obsidian. Personally, I prefer to roll my own colors and fonts for the Obsidian UI, and no theme ever gives me the look I want without considerable customization. Fortunately, in the Appearance tab of the Settings dialog, there's a Snippets property that enables you to create your own CSS stylesheet. This feature enables you to create only the styles you need to override the theme for specific UI elements.
The Snippets feature has a couple of advantages. First, you don't have to create a theme of your own, or try to figure out what the 10,000 lines of CSS styles in someone else's theme are doing. Second, If you have to update the theme—as you usually have to do on an occasional basis—updating the theme won't overwrite the changes you've made.
The Appearance tab of the Settings dialog also enables you to choose specific Fonts for the product UI, as well as the text font for every note, using the Interface Font and Text Font properties. I use my favorite Google fonts: Lexend for the UI and AbeeZee for text. They're super easy to read. In fact, they're the same fonts you're using to read this article.
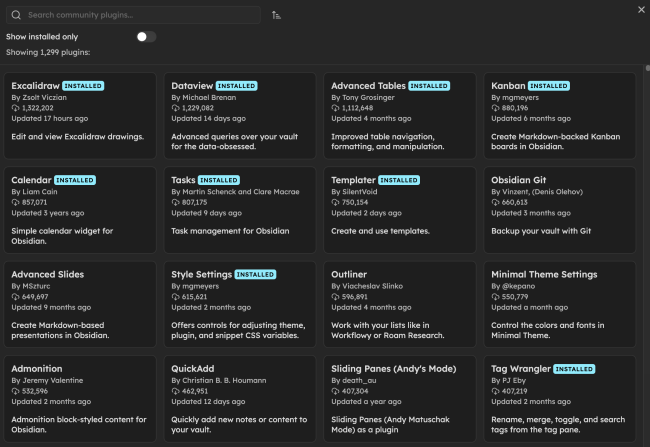 Obsidian is very powerful right out of the box, but there are over 1,000 community plugins, all of which are available from the Settings dialog box, as shown here. There's a few that I've found invaluable for creating the workflow and organization that I use.
Advanced Tables: Makes creating tables in Markdown super easy.
Calendar: Makes a little calendar widget to display in the UI. When you click on a date, it creates a daily note automatically.
Commander: Enables you to customize the Obsidian commands you want to display in menus, toolbars, and whatnot.
Dataview: This is a powerhouse. It treats your links, notes, and metadata properties like a searchable database that you can query with SQL-like syntax. It's simply a must-have plugin.
Excalidraw/Excalibrain: Excalidraw is a drawing tool to create diagrams, and it requires Excalibrain to work. Excalibrain enables you to incorporate notes, links and metadata to Excalidraw drawings, and works with Dataview.
Footnote Shortcut: Makes creating footnotes in a Markdown document super easy.
Homepage: Enables you to set a note or canvas as the home page for your vault.
Kanban: Enables you to create Kanban bins and cards, and drag and drop cards between bins. All Kanbans are in Markdown too, so at their heart, they're just plain text.
LanguageTool Integration: Enables LanguageTool as the spelling and grammar checker. It's a personal preference option for me.
Tasks: Enables you to create task lists, and converts Kanban cards, checkbox lists, etc. automatically into tasks, all of which can be queried using Dataview.
Templater: Enables you to create templates for documents, presentations, etc., that you can apply to any new note.
So, those are the tools I added to my Obsidian toolbox. Now, let's get into how I use them.
Setting up your Vault
Before you being creating any notes in Obsidian, you're going to want to think carefully about how you're going to work in the system, and how you want it to be organized. This is going to be highly dependent on the nature of the work you're going to do. You'll need to answer a few questions:
- How do I want my notes physically stored in the vault (Folder Structure)?
- How do I want to organize my notes' metadata (Properties)?
- How do I want my notes to be linked (Backlinks)?
We'll address these issues one at a time.
Folder Structure
Like most computer-based file systems, folders are how notes are physically organized in the vault. By default, Obsidian will place everything in the root folder of the vault, so you'll end up with many, many documents there. I certainly didn't want everything in one huge folder.
Folder structure is important because it can be queried via the Dataview plugin, e.g., by showing all the notes contained in a specific folder. Thus, it becomes one level of organization that you can play with when using Dataview to retrieve a list or table of notes to display elsewhere in your vault. It's the base layer of the vault's organization, followed by the metadata (Properties) you apply to your notes, then the Backlinks you create between individual notes.
While you can use more than one Vault in Obsidian, I wanted to keep both my professional and personal notes in a single vault. So I created a "BPL" folder for my business and professional log, and a "Personal" folder for my personal stuff. So, the physical structure of my vault provides a top-level separation between professional and personal notes.
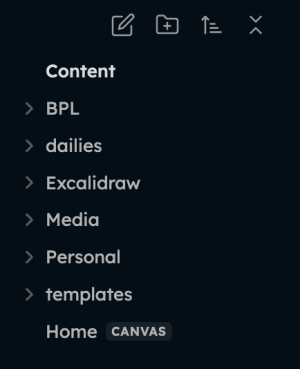 Both the Templater and Excalidraw community plugins, and the built-in Daily Notes plugin, conveniently enable you to specify a folder for templates, drawings, and daily notes, respectively, if you configure them to do so. Having a specific folder for all of my templates, both personal and professional, was a no-brainer, so I created a "templates" folder. Similarly, I knew that, while most of my daily notes would be BPL notes, I would occasionally have Personal ones, too. Ditto with Excalidraw drawings, as well as for any Media, like screenshots or other images.
I ended up with the six top-level folders shown here. The BPL and Personal folders store notes that fall into those specific areas, while all the rest store shared files that can be used for either professional of personal notes. We don't need to get excessively precise about creating folders, because we have the Properties and Backlinks levels we can use for organization, too. All I really needed to do was create a simple, top-level organization for my vault.
Metadata and Backlinks
Next, we have to address the Properties. Every note in Obsidian can have Properties, which I've used as the next level of organization. I decided to create four different properties for every note.
Type: Basically, I use this as the top-level metadata for a note. I have only two types: BPL and Personal. You'll notice immediately that these are the same names as the two folders I created. But, remember that I have both personal and professional items in the folders named "dailies" and "Excalidraw". I need to be able to specify whether an Excalidraw drawing is a BPL or Personal drawing, for example.
The Type property gives me a metadata property that I can query to list all items in any folder that matches the desired Type. There are times when I want to query only general notes and exclude the daily notes or drawings. In that case, I can query just the BPL or Personal folder with Dataview. But if I want to list all documents of the same Type, I can query the Type property to pull all items from the dailies and Excalidraw folders as well. In both cases, the queries I have to write for Dataview are very short and simple.
Category: This property is the second-level metadata for each note. It is, as the name implies, the category for each note. I have nine different categories, all of which are generic, like Writing, Security, List, Task, Webinar, etc. Both a BPL and Personal document Type can have any of these categories. For example, I might have both professional and personal documents in the Task category.
Tags: A document can have many tags, and I use them as a third level of organizational metadata. For example a shopping list might have the tags "Shopping", "Christmas", and "Gifts". Again, all of these tags can be queries in Dataview, enabling me to write simple queries that just return personal notes I've written for Christmas gifts, as opposed to, say, birthday gifts. Similarly, I can query all personal notes that have the tag "Christmas".
Index: Finally, we get to the last property, which identifies the Index page to which I want the note to be backlinked. In the graph shown at the top of the page, each of the dots represents a note in my vault, while each line indicates a link between notes. I wanted to create index pages that serve as the central list of all topics for a particular subject. For example, in my BPL folder, I have four index pages: BPL for general professional notes, Dailies for daily notes, Webinars for webinars I conduct, and Partner for managing the partner/reseller program.
These properties give me four levels of organization that, in addition to the folder structure, can all be queries in different ways. Moreover, by backlinking to Index pages, I can link pages between different folders, to aggregate topics from anywhere in my vault. Those links are what creates the graph shown above.
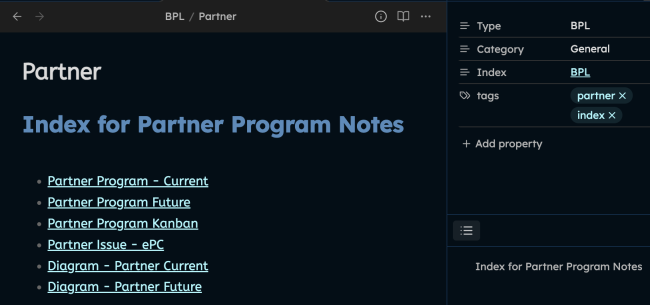 With 5 levels of structure, I can organize and query notes in a very sophisticated way, and return any subset of notes in Dataview. All the properties are displayed at the top of each note, by default, but I prefer to show them in a pane on the right sidebar, as displayed here. I don't like having the properties take up vertical editing space at the top of the note. This appearance is easily configured in Obsidian's Settings dialog box.
So, as an example, the image on the right is an index page for the Partner program. It shows links to all the notes that are relevant to the topic, which were generated by a Dataview query. On the right sidebar, we can see the Index, which links to the main BPL index page. The Type is BPL, the Category is General, and it has two tags, partner, and since it is an index page for a topic, it also has the tag index.
By the way, I've talked about Dataview queries a lot, but haven't described one. The list of notes shown on this page is generated from a Dataview query. This query lists all the pages that are backlinked to this index page. The query that makes this list is very simple:
LIST
WHERE Index = [[Partner]]
Similar queries on the other index pages create the lists of notes that are linked to them. The Dataview plugin is so useful that I have no idea why anyone would use Obsidian without it.
The Home Page
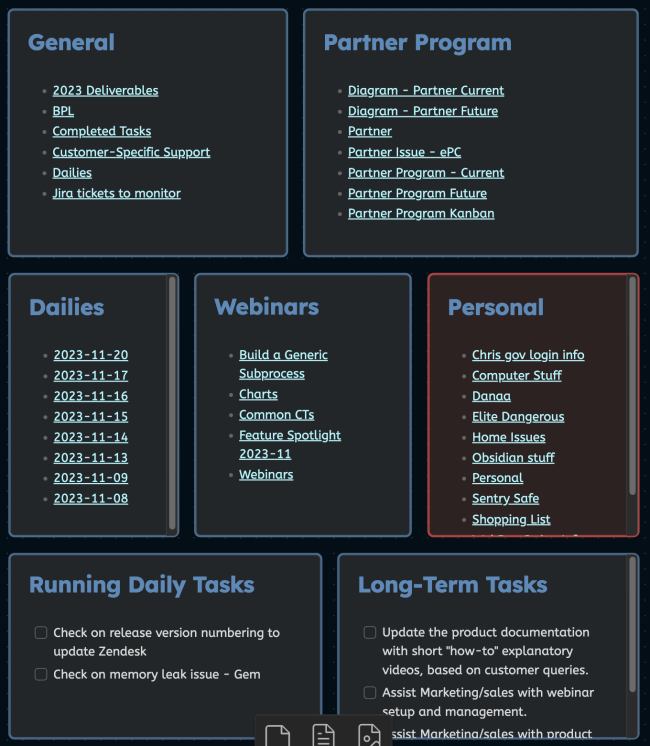 The homepage community plugin enables you to specify a note or canvas to show as your home page when you open Obsidian. I chose to use a canvas. The Obsidian canvas is a blank design surface that displays items as resizable cards. You can create a card by dragging and dropping an image or note onto the design surface. You can also drag a blank card onto the design surface to configure it yourself, which is what I did. Just as with everything else in Obsidian, cards are just containers for Markdown plain text. You can move and resize the cards on the design surface to display however you'd like.
Because I have a relatively robust organizational system of backlinks and metadata, I created several cards, each of which displays a list of specific notes. Each list is produced from a Dataview query. Of the seven different topics displayed on my home page, only one is personal. You can, as I did, format the cards to show the personal notes in a different color than professional ones. All the lists on my home page link directly to notes, So I can open any note by clicking on it from the home page.
The two bottom cards show two different categories of active, running tasks. Each day, I create a daily note that contains a task list of items that I need to complete in a short time. In addition, I have long-term task lists for tasks such as quarterly or annual goals. Finally, any Kanbans I create generate task lists automatically from the Kanban cards.
At the bottom of my home page, I have one card to display daily tasks, and one to display long-term tasks or goals. On the home page, I only want to show running tasks, not completed ones. Tasks are a little more complex to list via Dataview queries, so the query to display my active daily tasks is:
TASK
Where !completed AND text != ""
WHERE Type = "BPL"
WHERE Category = "Task"
I only want to show tasks that aren't completed (!completed) and that don't have a blank task name (text != ""). I need the latter because, in my templates, I already have starter tasks that display the checkbox for a task, but don't have a name. I don't want those blank tasks to appear in my query. The exclamation points in the query terms mean "not", which is similar to the syntax of C-based programming languages like JavaScript or C#. The rest of the query specifies the task to display based on the task's Type and Category properties.
The nice thing about having the tasks all show up on the home page is that I can access them and complete them directly from there. I don't have to find the note for each task, open it, and complete the task from each individual note.
I treat Kanban tasks a little differently. I don't want them to show up on my home page. I'd prefer to use the Kanban itself to deal with those tasks, though I could, if I wanted, display them as a task list on the home page. So, if click on the link to the Partner Program Kanban on the home page, it opens that Kanban.

Even though it doesn't look like it, the Kanban is also a plain-text note in Markdown text. The Kanban community plugin throws a lot of CSS magic at the Kanban to display it as Kanban bins that contain a bunch of cards. You can drag and drop each card between bins. Each Kanban card is treated as a task, so the Kanban page is really just a complex task list. You can specify which bin will mark the task as complete when the card gets dragged into it. In my case, it's obviously the Complete bin, though the name of the bin can be anything you'd like.
One final note on the home page cards: The lists for these cards might, over time, get a little long. Each card automatically displays a scroll bar when the content gets longer than the vertical height of the card. That's useful, but some lists, like the one in the Dailies card, are going to contain a huge number of items over time. I don't need to access my last 500 days of daily notes from the home page. So my Dataview query limits the number to display, to show only the most 20 recent daily notes.
LIST
WHERE Type = "BPL"
WHERE Category = "Task"
WHERE !contains(file.path, "templates")
SORT file.name DESC LIMIT 20
Note that one of the WHERE clauses excludes any daily notes that are stored in the "templates" folder. I want to exclude everything from that folder, because I don't want to show my daily notes template.
All of my daily notes use the date as the title, e.g., "2021-11-24", so I can use a SORT clause to show my daily notes starting with the most recent, while the LIMIT clause specifies that only 20 notes will be displayed in the card.
Once again, this query demonstrates how I can use both folder structure and metadata properties to create queries that produce very granular lists.
Note Templates
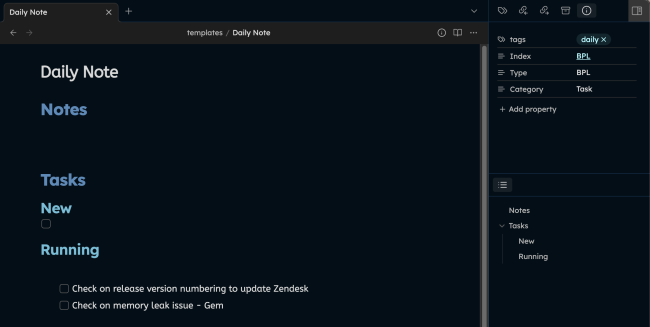 The Templater plugin enables you to create template files that can be applied to new notes when you create them. One of my templates is the Daily Note template shown here. Take note that this template has the default properties configured on the right sidebar. These properties will transfer to any new note created from this template. I can edit the properties quickly if I must. For example, while most daily notes are professional, some of them will be personal notes, so I'll just change the Type of the new note to Personal once I create it from the template.
In my case, I have five different templates:
BPL Meeting Notes: Template for a record of contemporaneous notes and action items generated from business/professional meetings, teleconferences, etc.
BPL Note: A generic note for business/professional topics.
BPL Presentation: A pre-formatted presentation template for creating a business/professional presentation to display from Obsidian. I'm basically using Obsidian instead of PowerPoint for my presentations and webinars, now.
Daily Note: All daily notes will, when created, use this template, so they all look the same, with a notes section at the top, followed by a list of tasks. At the bottom, a Dataview query shows all of my running daily tasks, just like the one on my home page. So, again, I can complete any running task from any daily note, without having to find and open the source note for a specific task.
Personal Note: A template for creating a generic personal note.
In almost every case, a new note that I create will use one of these five templates.
Drawings
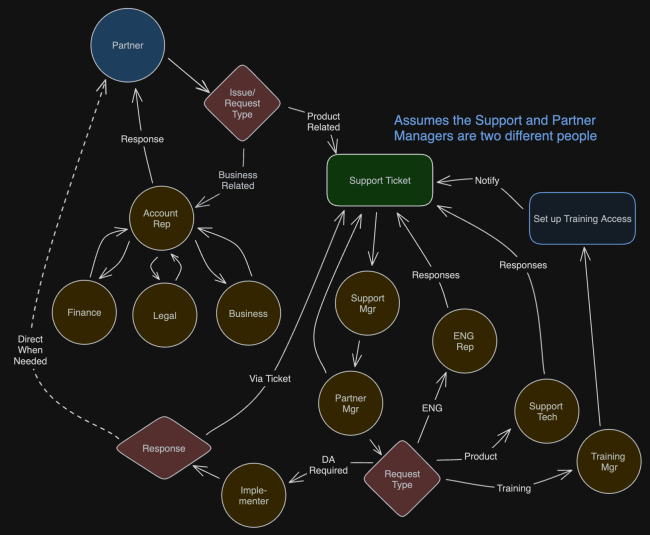 Last but not least, I'll cover drawings. I understand that many people won't need the Excalidraw feature to create custom drawings. For those people, the canvas will probably work fine. Canvas enables you to connect cards via arrow connectors to create mind maps for cards, notes and images. That's super useful, I suppose, but not quite enough for me. I need to be able to create flowcharts for processes, data flows, and whatnot, and the canvas wasn't designed to do that. So, I have the Excalidraw/Excalibrain plugins.
Excalidraw, admittedly, isn't the best drawing tool I've ever used. But it does offer enough customization and features to be very usable. There are a variety of flowchart shapes available, connectors automatically lock to shapes, and all the shapes are moveable and editable.
I've run into some issues when using Excalidraw. For instance, moving an existing shape doesn't always move the text inside the shape. So the shape moves, but the text stays in the original location. I know the text and shape are still linked, because deleting the shape deletes the text, just as double-slicking the shape highlights the text for editing. But I can't figure out how to move the text back inside the shape. It just hangs there in the original location. You have to delete the shape and recreate it when that happens. It's a relatively minor issue, but still irritating when your drawings start to get complex. Especially if there are five arrows connecting to the shape, because not only do you have to recreate the shape, but re-connect each of the arrows. It's a bit of a pain.
Also, the default format for the shapes are intended to make them look like rough, pencil-and-paper sketches. I don't like that. I prefer a cleaner, more formal look, if for no other reason than to increase the clarity and simplicity of the drawings. You can change the sloppiness setting that controls this. Once you change it, the setting sticks until you change it again, but I'd prefer the default be the minimum sloppiness level. The whole sloppiness thing feels like a gimmick. "Ooh, look, it's like it was sketched out by hand!" But why would I want my drawing to look like a hand-made sketch? I mean, just, why?
The drawings do, however, have the same metadata system as any other note, enabling you to backlink and add the standard properties to them. So, they're equally queryable through the Dataview, and they show up in lists just like a regular note. Moreover, you can insert the drawings into a note, as well as export them to PNG format to store and share as images. The pluses of using Excalidraw, therefore, outweigh the irritations of the drawing tool itself. And, honestly, even having this available in what's essentially a plain-text note-taking tool is amazing. OneNote certainly doesn't do anything like it.
Summing Up
That's the basics of how I've set up Obsidian. Obviously, you'll have a much different setup to match the specific stuff for which you use Obsidian. But my setup does, I think, at least illustrate the principles you need to hash out at the very beginning.
I've seen a lot of advice about getting into note-taking that consists of, basically:
To get into note-taking or journaling, or whatever, don't worry about structure or setup, or any of that technical stuff. All that stuff just stops you from doing what you need to do which is to start writing!
Yeah. Don't do that. I get that the results of creating notes and getting into writing them—indeed, creating the habit of writing—is important. But you really, really don't want to get 1,000 notes into using the system before thinking, "You know, it sure would be neat if this was organized better." Yes, it would. And now you need to create folders and properties, and open 1,000 different notes one at a time to apply them. This will be a time-consuming experience. You can avoid it by spending a far smaller amount of time, right at the start, in setting up the organizational structure before you begin.
So, here are some things to do before you create your first note.
- Determine the minimal folder structure that you need. Think of folders as the largest containers, to physically store files that fall into a few very broad categories. Remember, this is just a physical structure for file storage. Yes, that structure is queryable via Dataview, which is useful, but your primary method of organizing the data will be through properties, not the folder structure. Counting the four shared folders for templates, media, etc., you probably don't need more than six to eight folders.
- Create a metadata schema that you can impose via Properties. You're going to want to classify your data into two or three hierarchical categories. In my case, I have the top-level Type, followed by a larger list of Categories that can be applied to different note Types, then a set of Tags that can consist of anything, and be applied to any note. Finally, I have the Index property, which consists of a backlink to an index page. These four properties give me four different levels of metadata organization. Just four metadata properties, organized in this fashion, give you nearly unlimited organizational and querying capabilities.
- Create an index page or pages. An index page isn't really a page for content. Instead, it's the central link for other notes, and its purpose is to display a list of notes that are linked to it. It's a hub page, whose only content is a display of the linked pages in a Dataview query. You can start with a single index page, and build others as you expand to new topics. Each index page takes, like, 30 seconds to create. As you create new notes, they'll automatically have the correct links to the main index page in most cases, assuming you have your templates set up correctly.
- Speaking of templates, build them next. Add in the headings you want for a particular type of note. Add task lists as appropriate. Do whatever you'd like to ensure that new notes follow the same template, so that they're always familiar to you. You don't have to use a template for every new note...but it's certainly nice to have that option, to prevent redoing the same work over and over. For each template, be sure that you add the appropriate properties to each template, so that they exist already in every new note. It's best if each template has a default value for every property, so that the main metadata properties are already part of the new notes based on that template. If you want to change the properties in the new note, you can do it easily if the properties are already there. Otherwise, you'll have to create and apply the properties from scratch in every note.
Completing these four steps at the beginning will probably take a couple of hours. The thing is, it will take immensely longer to do later, when you're working with a mature vault. The key is getting this boring infrastructure stuff out of the way at the very beginning, so that you largely never have to think about it again.
As time goes by, you might want to add a new Type, Category, or Tag, but, since the properties already exist, you can just do that on the fly. Similarly, you might need to create a new index page when you start writing notes on a new topic. But you can do that in a matter of seconds. In fact, you can create an Index template (which, now that I'm writing this, I realize I need to do) that already has a pre-written Dataview query. All you'd need to do then is create a new index from the template, give it a title, edit the Index name in the Dataview query, and you're done in less than 30 seconds.
The important thing about setup is that if you start with a scalable structure for folders and properties, it just becomes a natural part of creating notes. Your organizational scheme gets applied automatically from templates. You want the structure to be an organic part of the vault, so that you largely don't have to deal with it on an ongoing basis. Setting up Obsidian like this enables the structure to simply flow into every new note, because it just gets supplied by the note's template.
So, with all the above finally said, I hope you find this helpful as you start your journey in Obsidian. I hope it's given you some ideas for how to think about your notes and their organization, and enables you to build an organized and useful vault to make Obsidian a valuable tool.
What I can say, definitively, is that it's been an exciting experience for me, and using Obsidian in this way has transformed how I work in a very brief time. I think it'll do the same for you.